
Cisco NX-OS Software
Cisco 통합 패브릭 제품군
모든 플랫폼에서 일관된 데이터 센터 운영 체제
- NX-OS 운영 체제는 다음과 같은 다양한 플랫폼을 지원한다.
- Nexus 9000
- Nexus 7000
- Nexus 5000
- Nexus 3000
- Nexus 1000V
- MDS 9000
- UCS
Cisco NX-OS and Cisco IOS Comparison
IOS 와 OX-OS의 주요 차이점
- NX-OS에 로그인 하면 바로 EXEC 모드로 진입한다.
- NX-OS에는 사용자가 시스템 기본값을 지정하고, 기본 구성을 수행하고, 미리 정의된 CoPP(Control Plane Plicing) 보안 정책을 적용할 수 있는 Setup Utility 가 있다.
- NX-OS는 Feature 기반 라이센스 모데을 사용한다. 필요한 기능에 따라 Enterprise 또는 Advanced Services 라이센스가 필요하다.
- Feature configuration 명령을 통해 OSPF, BGP 등과 같은 기능을 사용하거나 사용하지 않도록 설정 가능
- 특정 Feature를 활성화하기 전에는 구성 및 확인 명령을 사용할 수 없다.
- 인터페이스는 Ethernet 으로 레이블이 지정된다.
- 인터페이스 속도가 동적으로 학습
- Port-channel 이 Etherchannel을 대채 (no PAGP just LACP)
- NX-OS에는 사전 구성된 VRF 두 개가 있다. (Default, Management)
- 기본적으로 모든 Layer3 인터페이스 및 라우팅 프로토콜은 Default VRF에 있다.
- mgmt0 인터페이스는 Management VRF에 있으며 모든 VDC에서 액세스 할 수 있다.
- VDC가 구성된 경우 각 VDC에는 mgmt0 인터페이스에 대한 고유한 IP 주소를 갖게 된다.
- SSHv2는 기본적으로 사용하도록 설정된다.
- NX-OS 에서는 사용자 이름과 암호를 입력해야하며, 사용자 이름고 ㅏ암호 로그인을 사용하지 않도록 설정할 수 없다.
- 기본 로그인 관리자는 admin으로 미리 정의되어 있고, 시스템 전원을 켤 때 암호를 지정해야 한다.
- NX-OS 에는 더이상 write memory 명령어를 사용하지 않습니다.
- copy running-config startup-config 또는 alias 명령을 사용해야 한다.
- NX-OS의 기본 STP 모드는 Rapid-PVST+ 다. (멀티 스패팅트리 프로토콜 이렇게 딱 2개만 지원)
- 계층 독립 CLI를 통해 “show” 명령을 Exec 또는 config Mode 에서 실행할 수 잇다.
N9K(config)# show interface e1/1 Ethernet1/1 is up Hardware: 10/100/1000 Ethernet, address: 001b.54c1.5d44 (bia 001b.54c1.5d44) MTU 1500 bytes, BW 100000 Kbit, DLY 10 usec, reliability 255/255, txload 1/255, rxload 1/255 - CIDR 표기법 지원
N9K(config)# int e1/1 N9K(config-if)# ip address 192.168.0.1/24 255.255.255.0 이렇게도 가능 - 모드 인식 CLI 기록
N7K# show cli history N7K# show cli history config-mode - 인터페이스 표시 작동 상태에 reason을 표기
T-1# sh interf eth 2/3 Ethernet2/3 is down (linkNotConnected) Hardware is Ethernet, address is 00:1b:21:06:32:71 - range 명령어를 더이상 사용 x
T-1(config)# interface eth1/1-3 T-1(config-if-range)# T-1(config)# interface eth1/1,eth1/3 T-1(config-if-range)# - Feature별 Configuration 표시
N9K# show running-config ntp ntp server 171.68.10.80 use-vrf management ntp server 171.68.10.80 use-vrf management ntp source 172.26.244.101 clock format 12-hours clock format show-timezone - 긴 Configuration 의 Feature 제외 (Ex: ACL, QoS 등)
N9K# show running-config exclude aaa cert-enroll diagnostic ntp track acllog cef eem ipqos radius vshd aclmgr cmp license rpm callho copp monitor security me cdp dhcp spanning-tree - startup config 와 running config 비교
N9K# copy running-config startup-config
[#####################################]100%
N9K# config terminal
Enter configuration commands, one per line.
End with CNTL/Z.
N9K(config)# feature telnet
N9K(config)# sh running-config diff
*** Startup-config
--- Running-config
*** 1,11 ****
feature lacp
--- 1,11 ----
+ feature telnet
feature lacp
startup-config 와 running-config 간의 라인 번호 및 차이점 식별
1. Management
MGMT0
- 전용 인터페이스 및 VRF 를 통해 지정한 대역 외 관리를 제공하여 CP 또는 DP로 부터 100% 격리한다.
- MGMT0을 사용하면 MGMT0 인터페이스의 IPv4 또는 IPv6 주소로 장치를 관리할 수 있다.
- MGMT0 인터페이스는 10/100/1000 이더넷 인터페이스다.
- 가상 포트채널(vPC)을 구현할 땐 VPC keepalive 링크에 MGMT0 인터페이스 사용 권고.
Telnet
- NX-OS 장치에 대한 보안되지 않은 관리 연결을 제공한다.
SSH
- NX-OS 기기에 대한 보안관리 연결을 제공
SNMP
- 관리 시스템이 TCP/IP 프로토콜을 통한 통신 표준을 통해 기기를 모니터링하고 구성하는데 사용된다.
DCNM
- Cisco DCNM(Data Center Nerwork Manager)은 NX-OS 장치를 지원하는 관리 솔루션입니다.
- DCNM은 전반적인 데이터 센터 인프라 가동 시간과 안정성을 극대화하여 서비스 수준을 향상
- DCNM은 토폴로지 뷰, 이벤트 브라우저, 구성변경관리, 장치운영체제관리, 하드웨어 자산 인벤토리, 로깅 및 통계 데이터 수집 관리를 포함한 엔드-엔드 엔터프라이즈 가시성을 포함한다.
2. Setup Utility
NX-OS Setup 유틸리티는 시스템의 기본 구성을 안내하는 대화형 CLI모드다.
언제든지 Ctrl-C를 눌러 나머지 구성 옵션을 건너뛰고 관리자 암호를 제외한 지금까지 구성한 대로 진행할 수 있다.

Abort Power On Auto Provisioning [yes - continue with normal setup, skip - bypass password and basic
configuration, no - continue with Power On Auto Provisioning] (yes/skip/no)[no]: yes

---- System Admin Account Setup ----

Do you want to enforce secure password standard (yes/no) [y]: y    // password-strength checking

Enter the password for "admin": <password>
Confirm the password for "admin": <password>

---- Basic System Configuration Dialog ----

This setup utility will guide you through the basic configuration of
the system. Setup configures only enough connectivity for management
of the system.

Please register Cisco Nexus 9000 Family devices promptly with your
supplier. Failure to register may affect response times for initial
service calls. Nexus devices must be registered to receive
entitled support services.

Press Enter at anytime to skip a dialog. Use ctrl-c at anytime
to skip the remaining dialogs.
*Would you like to enter the basic configuration dialog (yes/no): yes- password-strength checking
- 최소 8자
- 연속된 문자를 많이 포함 x
- 반복되는 문자를 많이 x
- 사전 단어를 포함 x
- 고유명사를 포함 x
- 대문자와 소문자를 모두 포함
- 숫자를 포함
3. Modes
EXEC Mode
Global Configuration Command Mode

- EXEC Mode
- 처음 로그인 하면 Cisco NX-OS Software가 사용자를 EXEC 모드로 전환한다.
- Global Configuration Command Mode
- 글로벌 구성 모드를 사용하면 가장 광범위한 명령에 액세스할 수 있다.
- 글로벌이라는 용오넌 기기 전체에 영향을 미치는 특성 또는 특징을 나타낸다
- 글로벌 구성 모드에서 명령을 입력하여 장치를 전체적으로 구성하거나 더 구체적인 구성모드로 전환하여 인터페이스 또는 프로토콜과 같은 특정 요소를 구성할 수 있다.
4. Managing System Files
bootflash:, nvrm:, slot0:, usb1: 및 usb2: 파일 시스템에서 파일을 만들고 액세서 할 수 있다.
FTP, SCP(Secure Copy), SFTP(Secure Shell FTP) 및 TFTP를 사용하는 원격서버에서 시스템 이미지 파일도 다운로드 할 수 있다.
5. Role-Based Access Control Management (RBAC)
NX-OS 는 사용자 계정을 생성 및 관리하고 작업에 대한 액세스를 제한하는 역할을 할당할 수 있다.
- User Accounts
- 기본적으로 사용자 계정은 만료되지 않으며, 옵션을 통해 비활성되는 날짜 결정
- 사용자 암호는 Config 파일에 표시되지 않음
- 사용자 이름은 영숫자로 시작해야하며 다음과 같은 특수문자만 포함. )(+=._\-
- #! 기호는 지원안된다.
- User Roles
- 해당 역할이 할당된 사용자에게 허용된 작업을 정의하는 규칙이 포함
- 각 사용자 역할엔 여러 규칙이 포함 가능
- network-admin or vdc-admin : NX-OS 장치의 모든 기능에 대한 읽기 및 쓰기 가능
- network-operator or vdc-operator : NX-OS 장치의 모든기능에 대한 읽기 가능
💡 Cisco Nexus 9000 시리즈 스위치는 Multiple-VDC를 지원하지 않지만 vdc-… role을 사용할 수 있으며 network-… role과 동일한 권한과 제항니 있다.
- User Role Rules
- Rules은 Role의 기본요소. 작업을 정의
- Command, Feature 및 Feature group 매개 변수가 계층 관계를 갖는다.
- Command : 가장 기본적인 제어 명령
- Feature : Feature 와 관련된 모든 명령
- Feature group : 관련 Feature 를 결합한 모든 명령
- OID : SNMP OID 에 대해 읽기 전용 또는 읽기 및 쓰기 규칙을 구성
- 사용자지정 Rules 번호는 Rules 이 적용되는 순서를 결정.
- 내림차순
- User계정과 RBAC 에 대한 Default Settings

6. Rollback
- 네트워크 관리자가 스냅샷 또는 체크포인트에 스위치의 구성을 캡처할 수 있는 기능을 제공한다.
- 체크포인트를 롤백하여 다시 적용하면 체크포인트에 캡쳐 된 원래 구성을 쉽게 복원이 가능하다.
- 롤백을 사용하면 전문적인 지식이 없어도 체크포인트 구성을 적용할 수 있다.
- 체크포인트 복사본을 언제든 생성할 수 있다.
- 롤백 시 유형을 선택 할 수 있다.
- Atomic : 오류가 발생하지 않는 경우에만 롤백 진행 (Deafult)
- Best-effort : 오류 건너뛰고 롤백 진행
- Stop-at-first-failure : 오류가 발생하면 롤백 중지
- 롤백을 수행하기 전에 현재 구성에 적용되는 변경사항 볼 수 있다.
NX-OS는 특정 이벤트가 발생할 때 자동으로 체크포인트를 생성할 수 있다.
- 시스템에서 생성된 체크포인트 이름 : system- 로 시작되며 Feature 이름을 포함
- 자동 체크포인트 목적 : 주요 기능 사용하지 않거나 라이센스가 만료될 때 발생하는 네트워크 다운타임 최소화
- no feature 명령으로 기능 비활성화
- EIGRP, OSPF 또는 PIM 과 같은 계층 3 프로토콜 인스턴스 제거
- 기능의 라이센스 만료
Jealousy(config)# feature eigrp
Jealousy(config)# router eigrp 1
Jealousy(config-router)# autonomous-system 100
Jealousy(config-router)# exit
Jealousy(config)# no feature eigrp
Jealousy(config)# show check all
......
Name: system-fm-__inst_1__eigrp
제한사항
- VDC 당 최대 10개의 체크포인트 복사본 생성 가능
- 한 VDC의 체크포인트 파일을 다른 VDC에 적용 X
- 체크포인트 파일명은 75자 이하
- 체크포인트 파일 이름은 단어 auto로 시작 x
- 한 명의 사용자만 VDC에서 체크포인트, 롤백 똬는 running config를 startup config 에 복사할 수 있다.
- write erase 및 reload 명령 실행 후 체크포인트가 삭제
- clear checkpoint database 명령을 사용해 모든 체크포인트 파일을 지울 수 있다.
- 소프트웨어 버전 전반에 걸친 체크포인트에 대해선 롤백이 지원되지 않지만, 사용자는 재량에 따라 롤백을 수행할 수 있으며 best-effort를 사용해 오류를 복구 할 수 있다.
- Bootflash: 에 체크포인트를 생성하면 롤백을 수행하기 전에 현재 구성과의 차이를 수행할 수 없으며, 시스템에서 “No Change”을 보고합니다.
Virtual N9K 특성
- Boot 경로 지정
- dir로 이미지 확인
N9K-1# dir 4096 Apr 30 05:21:11 2024 .rpmstore/ 4096 Apr 30 05:22:28 2024 .swtam/ 3529 Apr 30 05:37:51 2024 20240430_053639_poap_9790_init.log 0 Apr 30 05:22:04 2024 bootflash_sync_list 4096 Apr 30 05:26:40 2024 eem_snapshots/ 4096 Apr 30 05:22:36 2024 evt_log_snapshot/ 2027 Apr 30 05:22:36 2024 log_profile.yaml 1814787072 Oct 26 11:29:48 2022 nxos64-cs-lite.10.2.4.M.bin 0 Apr 30 05:47:56 2024 platform-sdk.cmd 47 Apr 30 05:37:38 2024 poap_retry_debugs.log 4096 Apr 30 05:26:41 2024 scripts/ 34336 Apr 30 05:37:35 2024 ts-pack-pnp.ts 4096 Apr 30 05:25:10 2024 virtual-instance/ Usage for bootflash:// 1817808896 bytes used 2427457536 bytes free 4245266432 bytes total - 부팅
(conf)# boot nxos bootflash:nxos64-cs-lite.10.2.4.M.bin - 재부팅 및 확인
N9K-1# copy run start
[########################################] 100%
Copy complete, now saving to disk (please wait)...
Copy complete.

N9K-1# show boot
Current Boot Variables:
sup-1
NXOS variable = bootflash:/nxos64-cs-lite.10.2.4.M.bin
Boot POAP Disabled

Boot Variables on next reload:
sup-1
NXOS variable = bootflash:/nxos64-cs-lite.10.2.4.M.bin
Boot POAP Disabled
- dir로 이미지 확인
체크포인트
💡 체크포인트는 메모리에 상주한다. 그래서 꺼지면 날라간다.
N9K-1# checkpoint ospf_bgp

N9K-1# sh checkpoint

N9K-1# sh checkpoint ospf_bgp

N9K-1# show diff rollback-patch checkpoint ospf_bgp running-config
Collecting Running-Config
Generating Rollback Patch
Rollback Patch is Empty

N9K-1# sh checkpoint summary
1) ospf_bgp:
Created by admin
Created at Tue, 08:10:29 30 Apr 2024
Size is 11,530 bytes
User Checkpoint Summary
--------------------------------------------------------------------------------
Description: None

N9K-1# sh running-config ospf

!Command: show running-config ospf
!Running configuration last done at: Tue Apr 30 07:59:14 2024
!Time: Tue Apr 30 08:14:28 2024

version 10.2(4) Bios:version
feature ospf

router ospf 1

interface Ethernet1/1
  ip router ospf 1 area 0.0.0.0
ospf 를 날려버리자
N9K-1(config)# no feature ospf
N9K-1(config)# end
N9K-1# show run ospf
                ^
% Invalid command at '^' marker.
N9K-1# sh ip ospf ne
           ^
% Invalid command at '^' marker.
다행히 checkpoint 에는 존재할것이다.
N9K-1# sh checkpoint summary
1) ospf_bgp:
Created by admin
Created at Tue, 08:10:29 30 Apr 2024
Size is 11,530 bytes
User Checkpoint Summary
--------------------------------------------------------------------------------
Description: None

2) system-fm-__inst_1__ospf:
Created by admin
Created at Tue, 08:15:09 30 Apr 2024
Size is 11,530 bytes
System Checkpoint Summary
--------------------------------------------------------------------------------
Description: Created by Feature Manager.
rollback
N9K-1# rollback running-config checkpoint ?
  ospf_bgp
  system-fm-__inst_1__ospf

N9K-1# rollback running-config checkpoint system-fm-__inst_1__ospf
ADVISORY: Rollback operation started...
Modifying running configuration from another VSH terminal in parallel
is not recommended, as this may lead to Rollback failure.

Collecting Running-Config
Generating Rollback patch for switch profile
Rollback Patch is Empty
Collecting Running-Config
Generating Rollback Patch
Executing Rollback Patch
During CR operation,will retain L3 configuration
when vrf member change on interface
Generating Running-config for verification
Generating Rollback Patch

Rollback completed successfully.
확인
N9K-1# sh run ospf

!Command: show running-config ospf
!Running configuration last done at: Tue Apr 30 08:17:01 2024
!Time: Tue Apr 30 08:17:43 2024

version 10.2(4) Bios:version
feature ospf

router ospf 1

interface Ethernet1/1
  ip router ospf 1 area 0.0.0.0
그렇다면 장비가 꺼져도 남아있게 하고싶으면??
파일에 저장을 하자.
체크포인트 파일로 저장
N9K-1# dir bootflash:
       4096    Apr 30 05:21:11 2024  .rpmstore/
       4096    Apr 30 05:22:28 2024  .swtam/
       3529    Apr 30 05:37:51 2024  20240430_053639_poap_9790_init.log
       4752    Apr 30 08:16:50 2024  acfg_base_running_cfg_vdc1
          0    Apr 30 05:22:04 2024  bootflash_sync_list
       4096    Apr 30 05:26:40 2024  eem_snapshots/
       4096    Apr 30 05:22:36 2024  evt_log_snapshot/
       2027    Apr 30 05:22:36 2024  log_profile.yaml
 1814787072    Oct 26 11:29:48 2022  nxos64-cs-lite.10.2.4.M.bin
          0    Apr 30 05:47:56 2024  platform-sdk.cmd
         47    Apr 30 05:37:38 2024  poap_retry_debugs.log
       4096    Apr 30 05:26:41 2024  scripts/
      34336    Apr 30 05:37:35 2024  ts-pack-pnp.ts
       4096    Apr 30 05:25:10 2024  virtual-instance/

Usage for bootflash://sup-local
 1817817088 bytes used
 2427449344 bytes free
 4245266432 bytes total

N9K-1# checkpoint file bootflash:checkpoint_init
.Done

N9K-1# dir bootflash:
       4096    Apr 30 05:21:11 2024  .rpmstore/
       4096    Apr 30 05:22:28 2024  .swtam/
       3529    Apr 30 05:37:51 2024  20240430_053639_poap_9790_init.log
       4752    Apr 30 08:16:50 2024  acfg_base_running_cfg_vdc1
          0    Apr 30 05:22:04 2024  bootflash_sync_list
      11530    Apr 30 08:18:33 2024  checkpoint_init
       4096    Apr 30 05:26:40 2024  eem_snapshots/
       4096    Apr 30 05:22:36 2024  evt_log_snapshot/
......
확인해보자
N9K-1(config)# no username admin1
N9K-1(config)# no username admin2
롤백
N9K-1# rollback running-config file bootflash:checkpoint_init
ADVISORY: Rollback operation started...
Modifying running configuration from another VSH terminal in parallel
is not recommended, as this may lead to Rollback failure.

Collecting Running-Config
Generating Rollback patch for switch profile
Rollback Patch is Empty
Collecting Running-Config
Generating Rollback Patch
Executing Rollback Patch
During CR operation,will retain L3 configuration
when vrf member change on interface
Generating Running-config for verification
Generating Rollback Patch

Rollback completed successfully.
결과
N9K-1# sh run | i username
username admin password 5 $5$ECLPFH$zNeP2gfw2W0r8eMbrvHpFZYEXJ2Oq48pvCxGtH0BIT0
 role network-admin
username admin1 password 5 $5$PBPFKO$.4rIadpC7Hh4CJe9D2QiOaBdF9p3FO3gtjSYp5sNbs0
  role network-operator
username admin1 passphrase  lifetime 99999 warntime 14 gracetime 3
username admin2 password 5 $5$IAECOL$yc/SR20A5cBuh1CCXNtQFXqe0393D0p/fHmKuocEE21
  role OSPF_Config
username admin2 passphrase  lifetime 99999 warntime 14 gracetime 3
💡 파일로 저장하게 되면 메모리에 저장되는게 아니기 때문에 아래처럼 아무것도 안보인다.
N9K-4# sh checkpoint summary
N9K-4#
7. Port-Profiles
NX-OS는 인터페이스 그룹의 설정을 단순화 한다.
- 포트 프로파일을 이용해 공통 구성을 적용할 수 있다.!!

NX-OS는 인터페이스 그룹의 설정을 단순화 한다.
- 포트 프로파일을 이용해 공통 구성을 적용할 수 있다.!!\
- 포트 프로파일을 변경하면 모든 멤버 포트의 구성이 자동으로 업데이트 된다.
- Nexus 인터페이스에서 사용할 수 있는 모든 인터페이스 명령은 포트 프로파일의 일부가 될 수 있다. (ACL, L3, VLAN 등)
구성 우선 순위/순서
- 기본구성 < Port-profile < Manual configuration
Example
Kenya(config)# port-profile COMMUNITY1
Kenya(config-ppm)# switchport
Kenya(config-ppm)# switchport mode access
Kenya(config-ppm)# switchport private-vlan host-association 100 102
Kenya(config-ppm)# spanning-tree port type edge
Kenya(config-ppm)# spanning-tree bpdufilter enable
Kenya(config-ppm)# spanning-tree bpduguard enable
Kenya(config-ppm)# no shutdown
Kenya(config-ppm)# state enabled

Kenya(config)# interface ethernet 2/28
Kenya(config-if)# inherit port-profile COMMUNITY1
Kenya(config-if)# exit
Kenya(config)# exit

Kenya# show run int ethernet 2/28
interface Ethernet2/28
	inherit port-profile COMMUNITY1

Kenya# show port-profile
port-profile COMMUNITY1
	type: Ethernet description:
	status: enabled
......
8. Troubleshooting
- show command

- debug command
💡 디버그 명령은 네트워크/장치 성능에 영향을 줄 수 있으므로 Cisco 기술 지원 담당자의 안내에 따라 디버그 명령을 사용해야 한다.
콘솔에 디버그 출력을 보내는 것 보다 더 안전하고 처리하기 쉬운 로그 파일에 디버그 메시지를 저장 권고.
debug-filter 명령을 사용하여 원치 않는 디버그 정보를 필터링 할 수있다.
switch# debug-filetr ip eigrp interface e 1/1
switch# debug eigrp packets hello</code>
3. EthAnalyzer command
- NX-OS에는 스위치의 CP로 향하는 트래픽에 대한 상세한 프로토콜 수준 분석을 수행할 수 있는 기능이 있다.
- STP, OSPF, SNMP, CDP 등과 같은 CP 프로토콜의 문제를 해결할 때 매우 유용
- EthAnalyzer는 원격 위치에서 발생하는 다양한 트래픽에 대한 가시성을 제공한다. (Wireshark base)
- EthAnalyzer 기능은 DP 트래픽을 캡처하고 분석하는 데 사용할 수 없다.
- 스위치를 통과하는 트래픽은 CP에서 처리되지 않으므로 DP 트래픽 분석은 SPAN 또는 ERSPAN과 외부 네트워크 분석기를 사용하여 수행할 수 있다.
CMHLAB-N5K1# ethanalyzer local interface inband display-filter “igmp” detail
Capturing on inband
Frame 80 (64 bytes on wire, 64 bytes captured) Arrival Time: Mar 1, 2010 10:58:37.011710000
[Time delta from previous captured frame: 0.287940000 seconds]
[Time delta from previous displayed frame: 0.813212000 seconds]
[Time since reference or first frame: 1267441117.011710000 seconds]
Frame Number: 80
Frame Length: 64 bytes
Capture Length: 64 bytes
......CMHLAB-N5K1# ethanalyzer local interface inband display-filter “stp” write bootflash:stp.pcap detail
Capturing on inband
Frame 1 (68 bytes on wire, 68 bytes captured) Arrival Time: Mar 1, 2010 11:16:21.875330000
[Time delta from previous captured frame: 1267442181.875330000 seconds]
[Time delta from previous displayed frame: 1267442181.875330000 seconds]
[Time since reference or first frame: 1267442181.875330000 seconds]
Frame Number: 1
Frame Length: 68 bytes
Capture Length: 68 bytes [Frame is marked: False]
......
CMHLAB-N5K1# dir bootflash:
......
8331 Mar 01 11:16:23 2010 stp.pcapCMHLAB-N5K1# ethanalyzer local interface inband display-filter “stp” limit-captured-frames 20 write bootflash:stp1.pcap detail
Capturing on inband
Frame 1 (68 bytes on wire, 68 bytes captured) Arrival Time: Mar 1, 2010 11:16:21.875330000
[Time delta from previous captured frame: 1267442181.875330000 seconds]
[Time delta from previous displayed frame: 1267442181.875330000 seconds]
[Time since reference or first frame: 1267442181.875330000 seconds]
Frame Number: 1
Frame Length: 68 bytes
Capture Length: 68 bytes [Frame is marked: False]
......
20 packets captured
CMHLAB-N5K1# dir bootflash:
......
8331 Mar 01 11:16:23 2010 stp1.pcap
💡 NX-OS 9.3(x) 마이너 소프트웨어 릴리스에서 front-panel 및 port-channel 옵션 추가
Capture-Filter vs Display-Filter

- ‘limit-captured-frames’는 5로 설정되어 있다.
- capture-filter 옵션을 사용하면 Ethanalyzer에서 ‘host 10.10.10.2’ 필터와 일치하는 5개의 패킷을 표시
- Display-filter 옵션을 사용하면 Ethanalyzer는 먼저 5개의 패킷을 캡쳐하고 ‘ip.addr==10.10.10.2’ 필터와 일치하는 패킷만 표시한다.
4. Embedded Event Manager command
- 장치에서 발생하는 이벤트를 모니터링하고 구성에 따라 이러한 이벤트를 복구하거나 문제를 해결하는 작업을 수행한다.
- EEM 정책은 Event 와 하나 이상의 Action 으로 구성된다.
- Event은 찾을 이벤트와 이벤트에 대한 필터링 특성을 정의한다.
- Action 은 이벤트 발생 시 EEM이 수행하는 액션을 정의한다.
- 구성 가능한 최대 EEM 정책 수는 500개다.
Step1. Create an object to track the status of Ethernet interface eth1/1 :

switch# configure terminal
switch(config)# track 1 interface ethernet 1/1 line-protocol
switch(config-track)# endStep2. Configure an EEM event to shut Ethernet interface 1/5 when the tracking object shuts down :
switch(config)# event manager applet track_1_1_down
switch(config-applet)# event track 1 state down
switch(config-applet)# action 1 cli conf term
switch(config-applet)# action 2 cli interface ethernet 1/5
switch(config-applet)# action 3 cli shut
switch(config-applet)# endStep3. Configure an EEM event to bring up Ethernet interface 1/5 when Ethernet interface 1/1 comes up :
switch# configure terminal
switch(config)# event manager applet track_1_1_up
switch(config-applet)# event track 1 state up
switch(config-applet)# action 1 cli conf term
switch(config-applet)# action 2 cli interface ethernet 1/5
switch(config-applet)# action
switch(config-applet)# end**This example shows how to backup run-config to TFTP server.**
switch(config)# event manager applet CONFIG_BACKUP_TFTP
switch(config-applet)# description "Backup-Running-Config-To-TFTP"
switch(config-applet)# event cli match "copy running-config startup-config"
switch(config-applet)# action 1.0 cli copy running-config startup-config
switch(config-applet)# action 2.0 cli run-script bootflash:CONFIG_BACKUP_TFTP
switch(config-applet)# action 3.0 syslog priority notifications msg TFTP-Backup-Complete
switch(config-applet)# exit
switch(config)# cli alias name wr copy running-config startup-config
switch(config)# wr
Cisco Nexus Layer2
1. Spanning-Tree
STP는 Layer2 수준에서 루프가 없는 네트워크를 제공한다.
BPDU(Bridge Protocol Data Unit) 라고 하는 STP 프레임을 정기적으로 송수신하여 루프가 없는 경로를 구성!
NX-OS는 Rapid PVST+ 및 MST를 지원한다.
- Rapid PVST+ (Per VLAN Spanning Tree)
- 기본 스패닝 트리 모드이며 기본 VLAN과 새로 생성된 모든 VLAN 에서 사용하도록 설정되고, VLAN의 각 Rapid PVST+ 인스턴스에는 단일 루트 디바이스가 있다.
- MST (Multiple Spanning Trees)
- MST를 통해 지원되는 STP 토폴로지는 데이터 트래픽에 대한 여러 전달 경로를 제공하고 로드 밸런싱을 지원하며 많은 VLAN을 지원하는데 필요한 STP 인스턴스 수를 줄인다.
Cisco 독점 STP 강화 기술
- Spanning tree port types
- Type Normal : Default (IOS, 일반 STP 동작)
- Type Edge : Host 에 연결된 인터페이스 (= Portfast)
- Type Edge Trunk : ESXi 같이 여러 VLAN 을 운영하는 Host에 ㅇ녀결
- Type Network : Nexus에 연결된 인터페이스 (= Bridge Assurance)
- BPDU Guard
- BPDU가 수신되면 해당 인터페이스가 차단된다.
- Interface 수준 / Global 수준 설정 가능
- Global 수준 설정하면 작동 중인 모든 STP Edge 인터페이스에 BPDU Guard 적용
- BPDU Filtering
- 필터링 지정된 포트에서 BPDU를 송수신하지 못하도록 할 수 있다.
- Interface 수준 / Global 수준 설정 가능
- Global 수준 설정하면 작동 중인 모든 STP Edge 인터페이스에 BPDU Filtering 적용

- Loop Guard
- 단방향 링크 장애로 Blocked 상태에 있는 포트가 상대 포트에서 BPDU를 수신하지 못할 때 전송상태로 변경되는 것을 방지하는 기능
- Blocked 상태의 Port에 설정이 필요하고 Blocked 포트에서만 동작
- Root Guard
- 해당 포트를 루트 포트가 되도록 허용하지 않는다.
- 즉, Root Guard 설정이 된 포트로 더 낮은 값은 B-ID BPDU를 수신하게 되면 해당 포트를 차단한다.
- Interface 수준에서 설정하면 해당 인터페이스가 속한 모든 VLAN에 적용된다.
- Global 수준의 설정은 지원하지 않는다.

- Bridge Assurance
- 물리적 케이블 장애 또는 인접 스위치 CP 장애로 인한 모든 단방향 링크 이벤트로부터 L2 네트워크를 보호하는 기능이다.
- STP Type Network 포트에서만 사용할 수 있고, 양쪽 모두 Bridge Assurance(Type Network)로 설정되어 있어야 한다.
- 한 쪽 디바이스에 Bridge Assurance 설정이 되어있고, 다른 쪽 디바이스가 Bridge Assurance를 지원하지 않거나 설정 안되어 있으면 연결포트가 Blocked 된다.
- 스위치가 각 hello 기간에 대체 및 백업 포트를 포함하여 STP Type Network 설정된 모든 포트에서 BPDU를 전송하도록 한다.
- 즉, BPDU를 Keepalive 로 사용
- 포트의 Blocked 또는 Forwarding 상태에 관계없이 동작된다.
- Bridge Assurance BPDU는 SUP의 CPU에서 처리되고 주기적으로 전송된다. (Default 2sec)
- Bridge Assurance BPDU는 STP BPDU 와 동일하다.

Cisco Nexus VPC (Virtual Port Channel)

Nexus는 서로 다른 장비에서 연결된 Port를 묶어 하나의 논리적인 포트로 인식하게 하는 기존 Port-Channel의 확장된 개념인 vPC (Virtual Port Channel) 를 지원한다.
- 기존 Port-Channel 은 Layler-2, Layer-3 모두 설정 가능하지만, vPC는 Layer-2만 가능
- feature 명령을 통해 vPC를 활성화
Spanning Tree 를 사용하는 기존의 Port-Channel보다 빠른 Convergence 가능
Loop-free Topology를 제공하기 때문에 Spanning-Tree 의 Blocked Port 제거
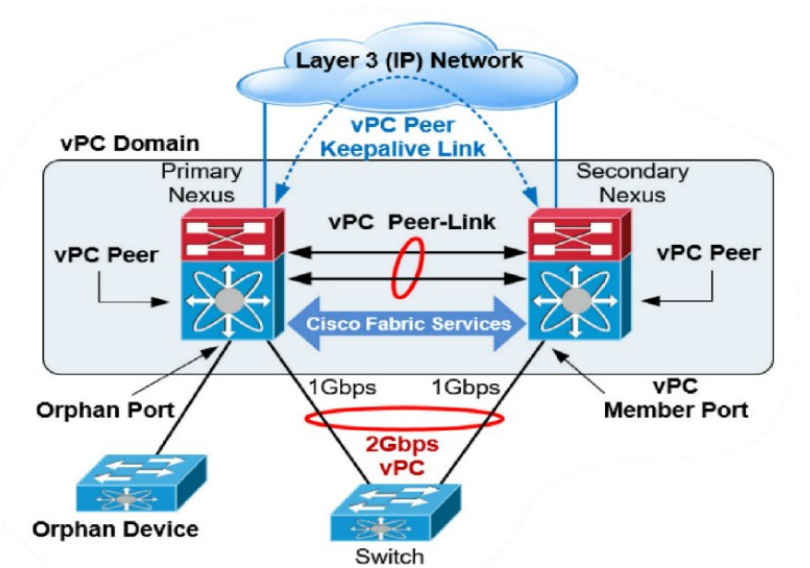
| 용어 | 개념 |
| VPC domain | VPC를 사용하는 1쌍의 switch |
| VPC peer | VPC domain을 구성하는 1개의 switch |
| VPC | downstream device(예: switch, server) 에 대한 port-channel |
| VPC member port | VPC를 만드는 port-channel의 1 port |
| VPC peer-link | VPC peer 간의 control-plane 동기화를 위해 사용하며, 평상시엔 unicast traffic은 전송하지 않음 |
| keepalive-link | Dual-active를 방지하기 위해, heart-beat 용도로 사용한다. |
| Orphan device | 1개의 VPC peer에만 연결된 장비 |
vPC 는 2개의 Nexus 디바이스를 vPC 도메인 으로 구성하고, vPC 도메인 내에서 2개의 특수 링크를 통해 vPC 피어 간에 정보를 교환한다.
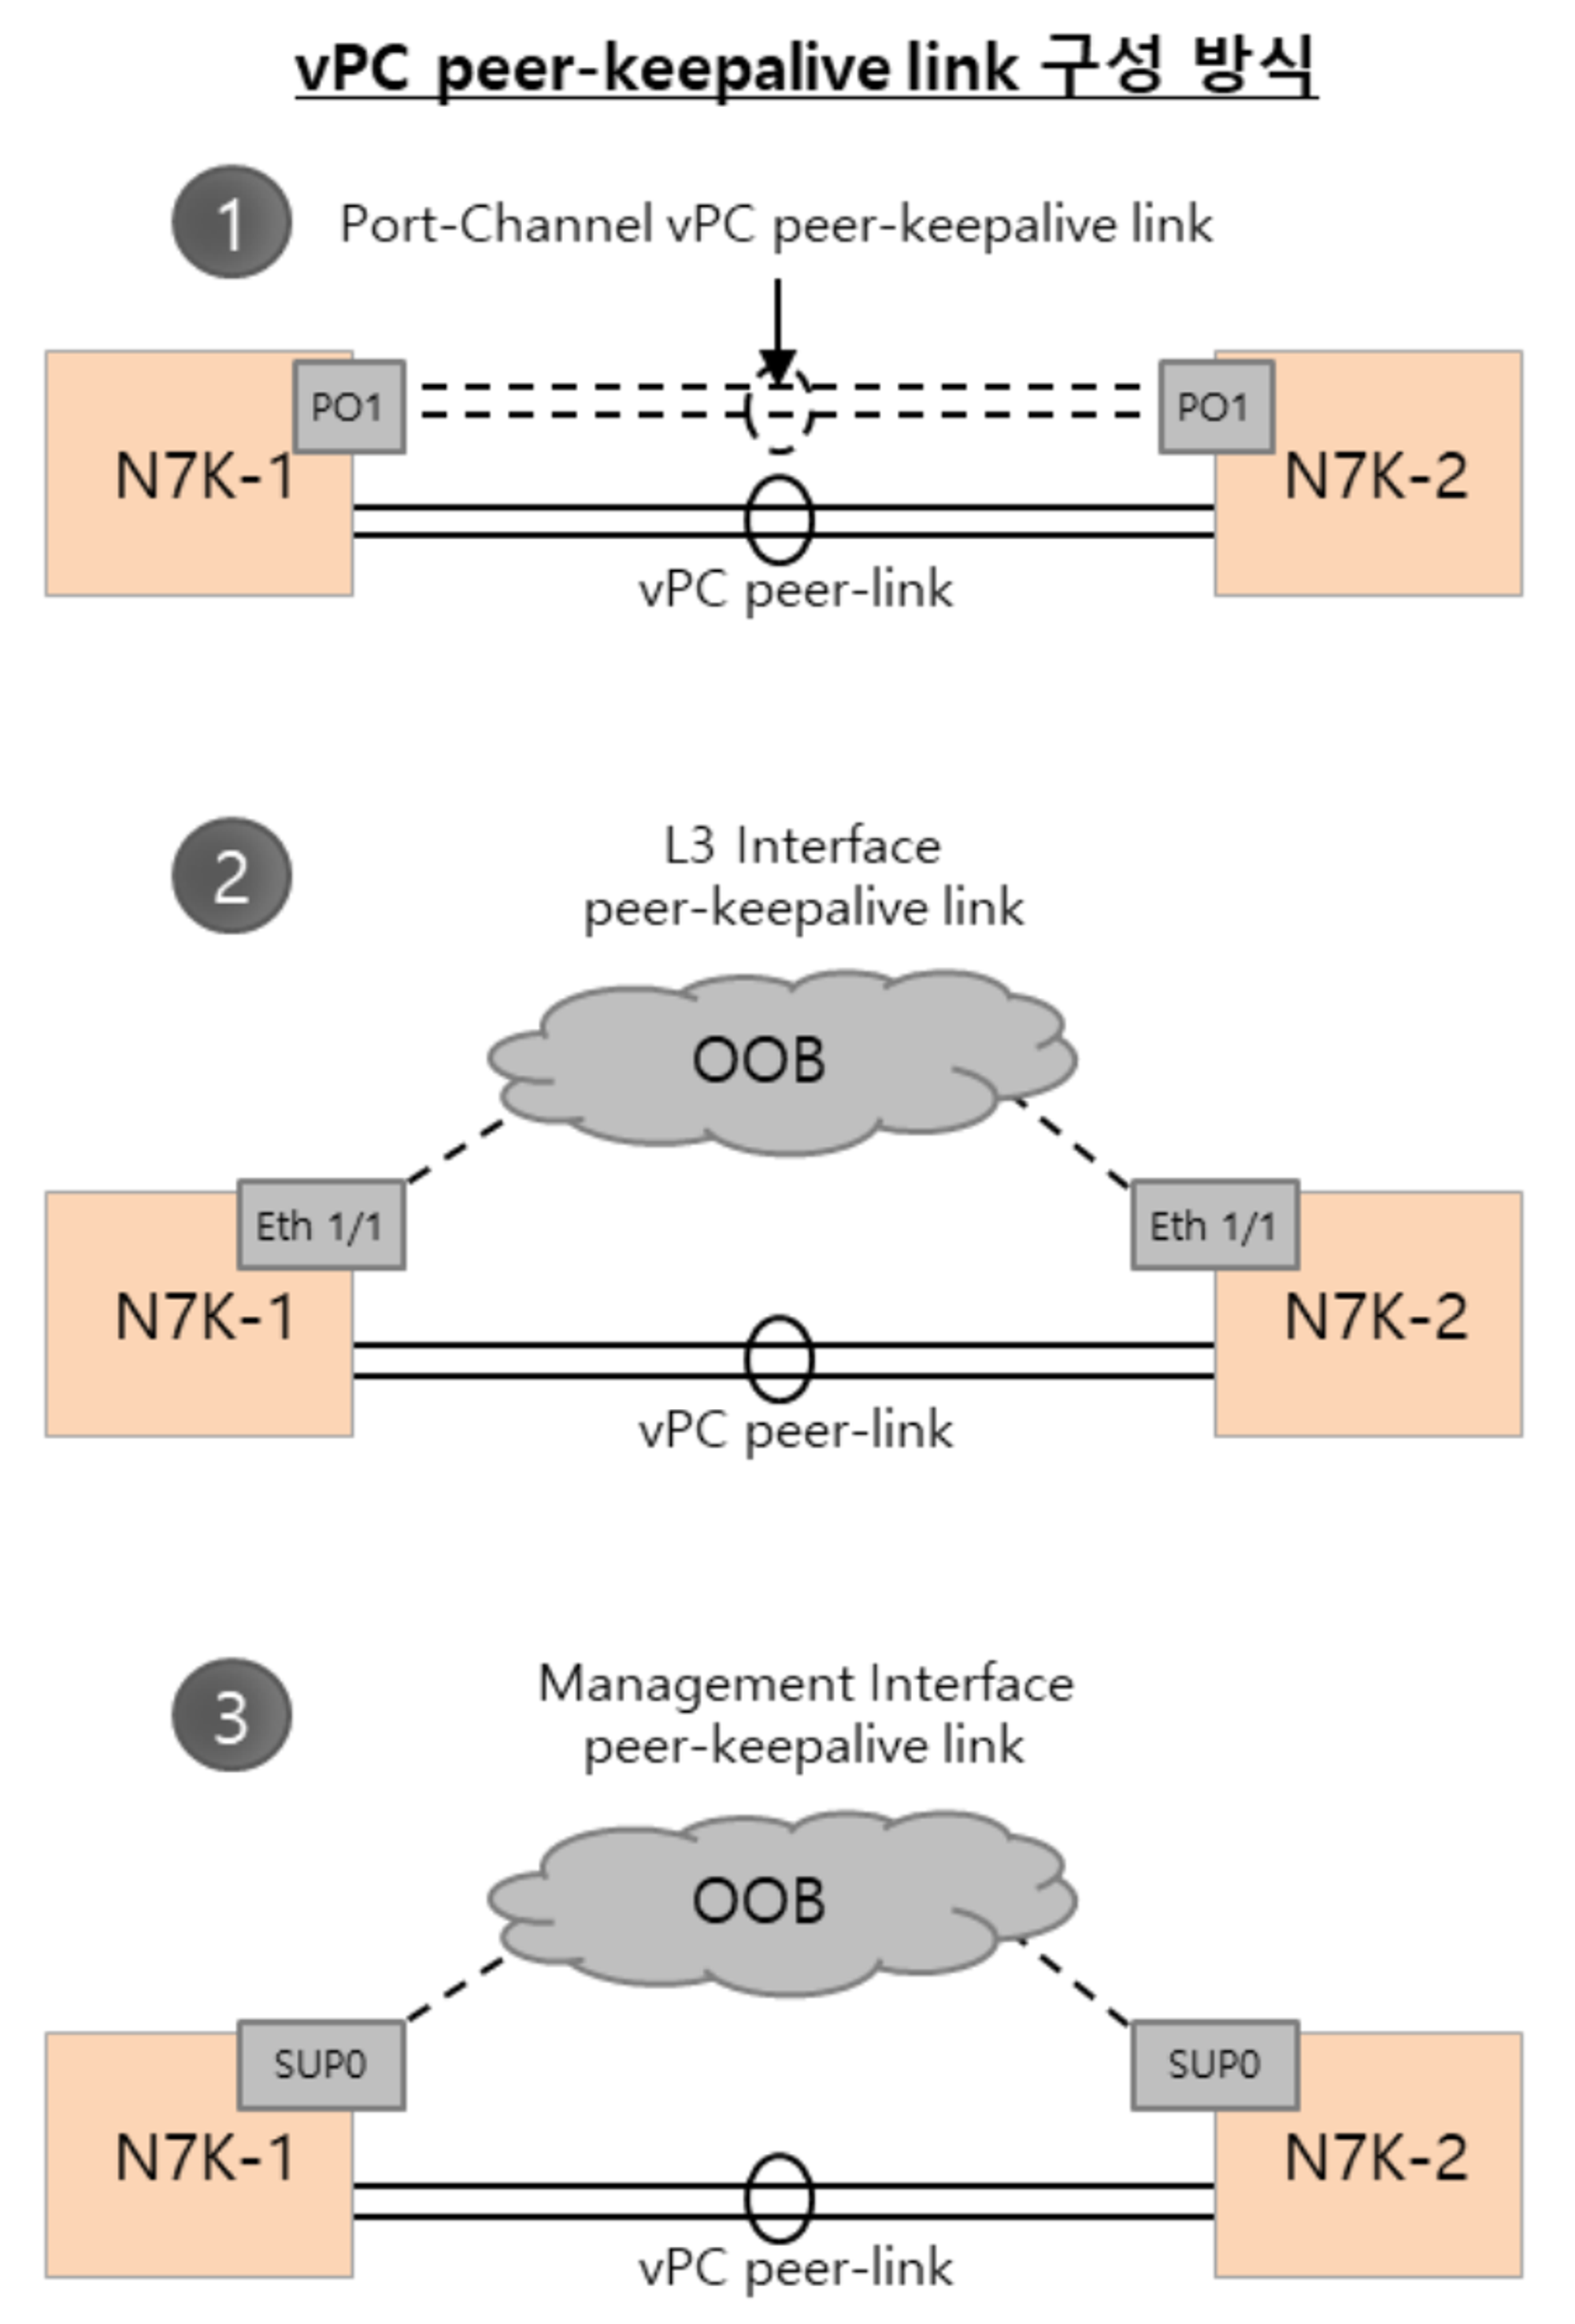
- vPC Peer-Keepalive Link
- vPC Peer간 Heartbeat 을 통해 Online 상태 확인 및 vPC 구조에서의 Loop 발생 회피
- MGMT0 혹은 SVI로 구성이 가능
- 별도의 VRF를 사용하여 vPC peer간의 Layer3 인터페이스로 구성하는것을 권고
- 별도의 VRF를 구성하지 않으면, 시스템에서는 management VRF를 사용함. (Default)
- Mgmt0을 peer-keepalive link로 사용할 경우엔 Active Sup / Standby Sup 의 각 mgmt0에 management switch를 통해 연결되어 잇어야 함
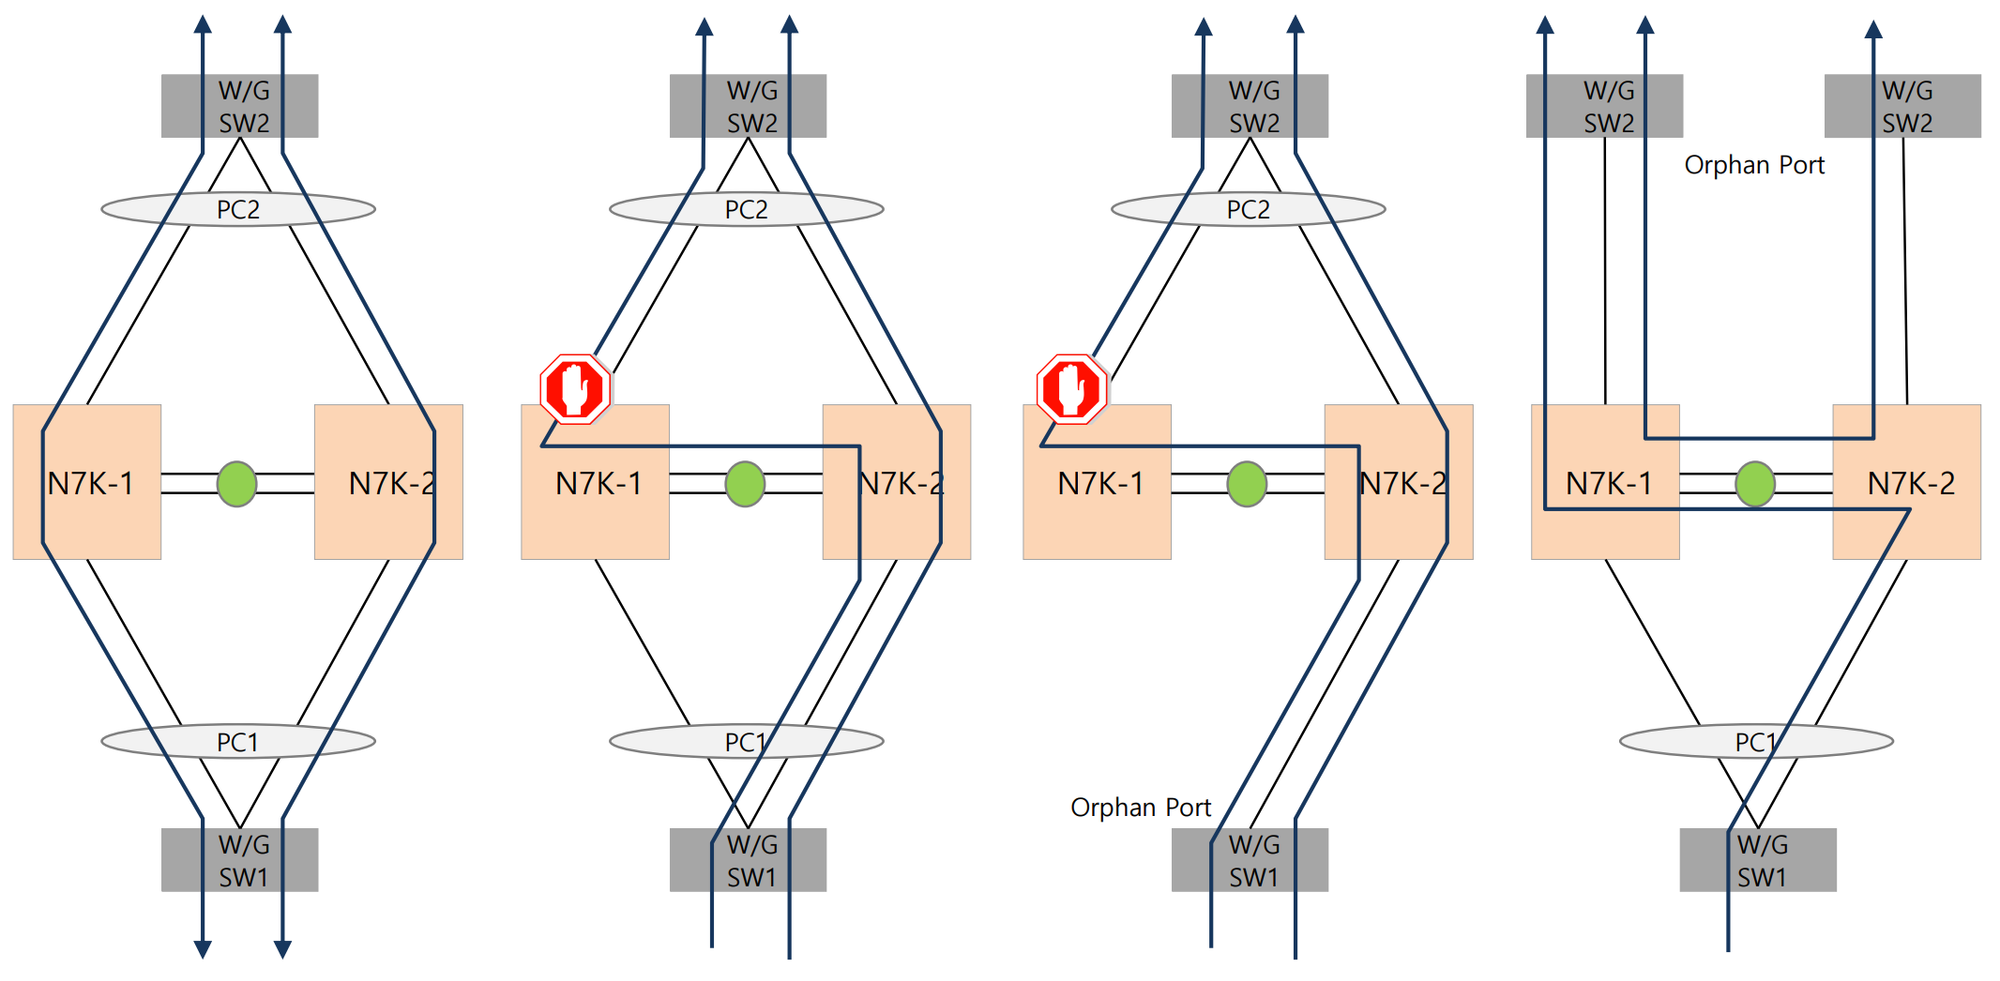
- vPC Peer Link
- vPC 피어 간에 상태 정보를 교환
- Cisco Fabric Services (CFS)가 자동으로 enable되어 CP 정보를 Sync 한다.
- vPC Peer-link 는 Layer2 port channels(trunk)로 구성하는 것을 권고
- vPC Peer-link 는 반드시 10GbE Port 여야 하며, 모듈 이원화 권고
- vPC 피어 간에 상태 정보를 교환
💡 1. 트래픽 흐름 금지: 기본적으로 peer-link에는 트래픽이 흐르지 않아야 합니다. 이는 VPC의 안정성을 유지하고 루핑(looping)을 방지하기 위한 것입니다.
2. Control Plane Communication: peer-link을 통해 컨트롤 플레인 트래픽은 허용됩니다. 넥서스 스위치 간의 VPC 구성과 관련된 프로토콜 및 상태 정보 교환을 위해 peer-link를 사용할 수 있습니다.
vPC Control-Plane
- VPC는 control-plane이 분리되어 있다.
- 분리된 control-plane 간에 정보를공유하기 위해, 내부적으로 CFS가 동작 (Peer-Link)
vPC Data-Plane
- loop 방지 위해 VPC member port에서 수신한 data 는 peer-link 를 통해 다른 VPC member에게 전달되지 않도록 설계 (Loop Avoidance)
- 결국 VPC는 traffic을 수신한 peer switch가 traffic 을 전달 (Local 처리)
- Local 처리의 두가지 예외
- Member Port 장애 시
- Orphan Device 와 통신 시
Loop Avoidance

- vPC peer device는 가능한 한 트래픽을 로컬에서 처리한다 (Rule #1)
- vPC member 포트에서 들어온 트래픽을 로컬에서 처리할 수 없는 환경에서 vPC peer-link를 통해 상대방에게 marking을 하여 보낸다.
- vPC는 Loop 방지를 위해 상대방 vPC member포트로 부터 받은 트래픽을 어떠한 vPC member포트로도 전송 할수 없다.STP는 Loop 방지를 위해 BPDU를 사용해 CPU가 처리하지만, vPC는 Rule #2를 이용해 H/W 기반에서 처리한다.단, L3 Port 나 orphan port에게는 전송할 수 있다. (Rule #2)
- vPC member 포트 down 시 CFS를 통해 상대방에게 vPC member port 상태를 신속히 알려주어 해당 vPC member 포트로 전송할 수 있다.
vPC의 가장 중요한 규칙은 vPC Loop Avoidance Rule 과 Local 트래픽 처리 Rule 이다.
Example
1. Configure the vPC Domain
- vPC Domain ID는 vPC Peer간 동일해야 한다.
- vPC Domain 내에서 두개의 vPC peer가 vPC 설정 시 vPC System MAC을 자동 생성한다.
- vPC peer device는 동일한 vPC system Mac을 갖게 되며 외부장비에서 동일한 장비로 인식한다.
- vPC peer device는 각각 다른 vPC Local System MAC 갖게 되며, 이는 Orphan Port 등 동일 vPC Domain 상에서 Unique한 MAC 을 가지고 통신이 필요할 때 사용한다.
N9K-1(config)# feature vpc
N9K-1(config)# vpc domain 10
N9K-1(config-vpc-domain)# role priority 4000
N9K-1(config-vpc-domain)# show vpc role
1.5. Configure the vPC Domain (Role Priority)
- vPC는 운영상 Primary와 Secondary로 동작
- Primary vPC device는 STP BPDU를 처리하며, ARP Request에 대해 응답하는 역할
- Command를 통해 vPC Role Priority 설정할 수 있으며, Priority가 낮은 장비가 Primary 역할을 수행
- vPC Role Priority 설정을 않하면 vPC Local System-mac이 낮은장비가 Primary
- Peer-Link가 DOwn시 vPC Secondary 장비는 모든 vPC MemberPort을 Down 시킨다.
- 또한 vPC Secondary 는 vPC VLAN과 관련된 모든 SVI 인터페이스를 Down시킨다.
N7K-1(config)# vpc domain 5
N7K-1(config-vpc-domain)# role priority 1
N7K-2(config)# vpc domain 5
N7K-2(config-vpc-domain)# role priority 2
2. Configure the vPC Peer-Keepalive Link
- vPC peer-keepalive link 용 전담 VRF를 생성하여 사용한다.
N7K-1(config)# feature lacp
N7K-1(config)# feature vpc
N7K-1(config)# interface ethernet 1/1, ethernet 2/1
N7K-1(config-if)# channel-group 1 mode active

N7K-1(config)# vrf context PKAL

N7K-1(config)# interface port-channel 1
N7K-1(config-if)# vrf member PKAL
N7K-1(config-if)# ip address 172.168.1.1/24

N7K-1(config)# vpc domain 5
N7K-1(config-vpc-domain)# peer-keepalive destination
172.168.1.2 source 172.168.1.1 vrf PKAL
3. Configure the vPC Peer-Link
- vPC peer-link는 802.1Q Trunk포트로 구성
- 주요 역할은 vPC 구성을 통한 CFS Protocol 통로로 사용된다.
- vPC Peer-link는 최소 2 * 10GE 로 모듈 이원화 구성을 권고. (1GE는 config 적용되지 않늠)
- vPC VLAN 과 non-vPC VLAN용 Interlink 분리 사용 권고
- vPC Peer간 Direct 연결을 해야한다.
- vPC Peer-Link간 STP Port Type은 Bridge Assurance기능이 포함된 “Network” Type 사용(Default)

N7K-1(config)# feature lacp
N7K-1(config)# feature vpc
N7K-1(config)# interface ethernet 3/1, ethernet 4/1
N7K-1(config-if)# channel-group 2 mode active
N7K-1(config)# interface port-channel 2
N7K-1(config-if)# switchport mode
N7K-1(config-if)# switchport mode trunk
N7K-1(config-if)# switchport trunk allowed vlan 1-100
N7K-1(config-if)# spanning-tree port type network
N7K-1(config-if)# vpc peer-link
4. Configure the vPC Member Port
- vPC에선 Layer3 Port-Channel을 지원하지 않는다.
- Access Device 연결 방법은 가능한 802.3ad (LACP Protocol)사용 권고
- vPC Member Port는 Bridge Assurance 기능이 Disable 된 STP Port Type Normal 사용 (Default)
N7K-1(config-if)# interface ethernet 2/3
N7K-1(config-if)# channel-group 10 mode active

N7K-1(config)# interface port-channel 10
N7K-1(config-if)# switchport
N7K-1(config-if)# switchport mode trunk
N7K-1(config-if)# switchport trunk allowed vlan 1-100
N7K-1(config-if)# spanning-tree port type normal
(필요하면 사용) N7K-1(config-if)# spanning-tree port guard root
N7K-1(config-if)# vpc 10